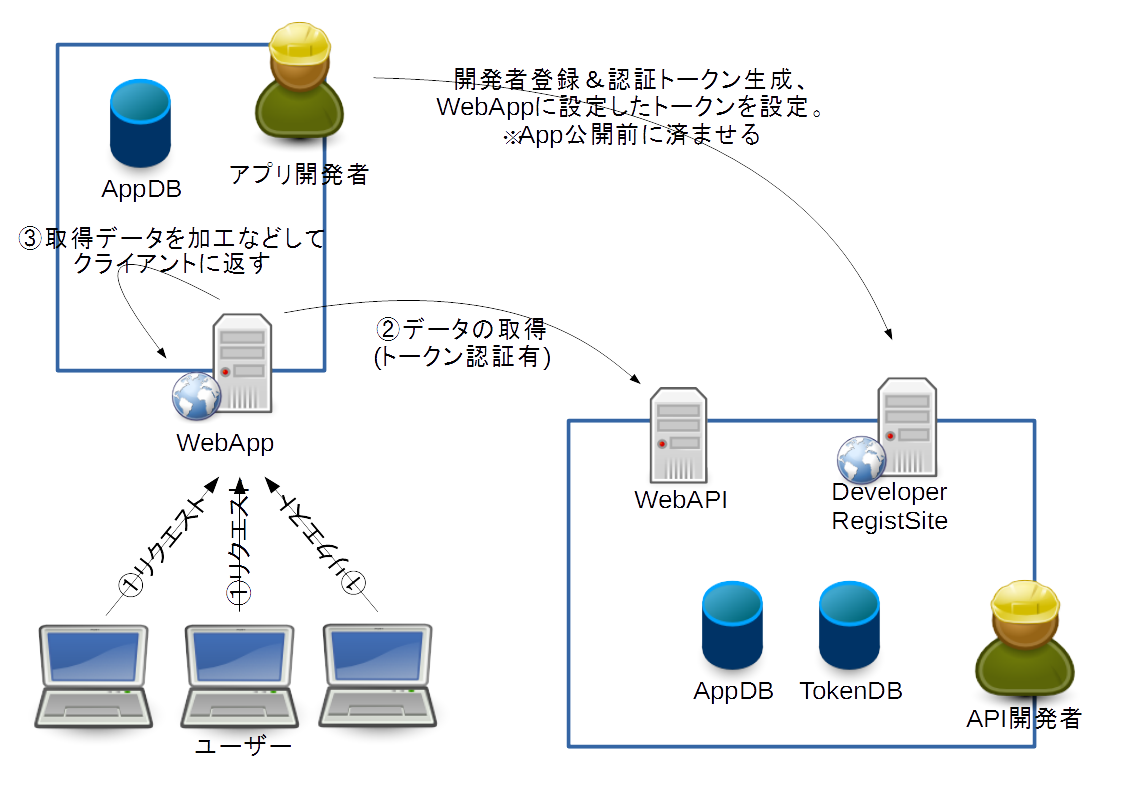
Nancyでのトークン認証について(WebAPI(認証有)、トークン生成アプリが別の場合)
前回の続きです。
WebAPIの認証機能の実装について
「API利用する開発者ごとに固有のトークンを生成、これで認証を行う」ようなことを実現するための調査を行いました。
WebAPIは Nancy の使用して実装することを前提で進めます。
Nancyでは認証の種類として、ステートレス認証*1 ・ フォーム認証 ・ トークン認証 が標準で用意されています。
このうち、名前もズバリなトークン認証 を使うことにします。しかし、
トークン認証ドキュメントページ中のコードは、トークン発行ページ(DeveloperRegistSiteに相当)、トークン認証ページ(WebAPIに相当)が同じWEBアプリ内に存在することが前提となっているため、
個今回実現したいそれぞれが別のWEBアプリとして構成されている場合に対応できませんでした。
別WEBアプリ間でのトークン認証に対応させる
デフォルトでは、暗号化キー保存ををローカルファイルに行います。 (FileSystemTokenKeyStoreクラス を使用)
このため、DeveloperRegistSiteとWebAPIがそれぞれ別々に暗号化キーを持つことになります。
対処方法としては、案1.共通のキー保存ファイルを使うように設定する。 案2.保存場所をローカルファイル以外の共通参照できるものに変更する。 が考えられます。
今回は案2で対応することにしました。KeyStoreクラスは以下のように実装しました。(DBアクセスはDapperを使用)
--テーブル定義

CREATE TABLE [dbo].[token_key_store](
    [ticks] [bigint] NOT NULL,
    [ekey] [binary](64) NOT NULL,
 CONSTRAINT [PK_token_key_store] PRIMARY KEY CLUSTERED
(
    [ticks] ASC
)WITH (PAD_INDEX = OFF, STATISTICS_NORECOMPUTE = OFF, IGNORE_DUP_KEY = OFF, ALLOW_ROW_LOCKS = ON, ALLOW_PAGE_LOCKS = ON) ON [PRIMARY]
) ON [PRIMARY]
//DBに対して値を読み書きするKeyStoreクラス

using System;
using System.Collections.Generic;
using System.Linq;
using System.Text;
using System.Threading.Tasks;
using System.Data;
using System.Data.SqlClient;
using Nancy.Authentication.Token.Storage;
using Dapper;

namespace Tokenken2Common
{
    public class DBTokenKeyStore : ITokenKeyStore
    {
        private IDbConnection con;

        public DBTokenKeyStore(string connectionString)
        {
            this.con = new System.Data.SqlClient.SqlConnection(connectionString);
        }

        /// <summary>
        /// パージ
        /// </summary>
        public void Purge()
        {
            con.Open();
            IDbTransaction tran = con.BeginTransaction();
            try
            {
                con.Execute("delete from token_key_store", null, tran);
                tran.Commit();
            }
            catch
            {
                tran.Rollback();
                throw;
            }
            finally
            {
                con.Close();
            }
        }

        /// <summary>
        /// 取り出し
        /// </summary>
        /// <returns></returns>
        public IDictionary<DateTime, byte[]> Retrieve()
        {
            con.Open();
            try
            {
                return con
                    .Query("select ticks, ekey from token_key_store order by ticks")
                    .Select<dynamic, Tuple<long, byte[]>>((src) =>
                    {
                        return new Tuple<long, byte[]>(
                            Convert.ToInt64(src.ticks),
                            (byte[])src.ekey);
                    })
                    .Aggregate(new Dictionary<DateTime, byte[]>(), (memo, item) =>
                    {
                        memo[DateTime.FromBinary(item.Item1)] = item.Item2;
                        return memo;
                    });
            }
            finally
            {
                con.Close();
            }
        }

        /// <summary>
        /// 格納
        /// </summary>
        /// <param name="keys"></param>
        public void Store(IDictionary<DateTime, byte[]> keys)
        {
            con.Open();
            IDbTransaction tran = con.BeginTransaction();
            try
            {
                con.Execute("insert into token_key_store(ticks, ekey)values(@TICKS, @EKEY)", keys.Select((i) => new { TICKS = i.Key.Ticks, EKEY = i.Value }), tran);
                tran.Commit();

                //foreach (var k in keys)
                //{
                //    if (1 <= con.Execute("select count(*) from token_key_store where ticks = @TICKS", new { TICKS = k.Key.Ticks }, tran))
                //        continue;
                //    con.Execute("insert into token_key_store(ticks, ekey)values(@TICKS, @EKEY)", new { TICKS = k.Key.Ticks, EKEY = k.Value }, tran);
                //}

                //tran.Commit();
            }
            catch
            {
                tran.Rollback();
                throw;
            }
            finally
            {
                con.Close();
            }
        }
    }
}
次に、このKeyStoreクラスをDIコンテナに登録する必要があります。
using System;
using System.Collections.Generic;
using System.Linq;
using System.Web;
using System.Configuration;
using Nancy;
using Nancy.Authentication.Forms;
using Nancy.Authentication.Token;
using Tokenken2Common;

namespace Tokenken2
{
    public class MyBootstrapper : DefaultNancyBootstrapper
    {
        protected override void ApplicationStartup(Nancy.TinyIoc.TinyIoCContainer container, Nancy.Bootstrapper.IPipelines pipelines)
        {
            base.ApplicationStartup(container, pipelines);
            container.Register<ITokenizer>(new Tokenizer((config) =>
            {
                config.WithKeyCache(new DBTokenKeyStore(ConfigurationManager.AppSettings["tokenDbConnection"]));
            }));
        }
    }
}
これらを実装することで、暗号化キー情報がDBに保存されるようになり、別Webアプリからトークン認証が可能になるはずです!
と思っていたのですが、いざ実験していると認証に失敗します。。
調べてみたところ、デフォルトでは認証トークン生成時リクエストのUserAgentとトークン認証時リクエストのUserAgentが一致しないと認証エラーになるようです。
(認証トークンにUserAgentを含めておき、認証処理時に取り出して認証時リクエストのと一致するか確認する。)
今回想定しているのは、手順1.開発者サイトにブラウザでログインしてトークン生成する。 手順2.WebAppのサーバーサイド処理でWebAPIにリクエストして情報取得する。 の2ステップです。
この場合、確実に各手順でのUserAgentは異なります。手順1でのUserAgentをWebAppでも使用するスマートな方法があればいいのでしょうが、そんなものは思いつきませんでした。困りました。。
調べたところ、トークンに含める情報の設定は、DBTokenKeyStoreクラスの登録と同様にコンストラクタで設定できるようです。
これで、UserAgentは認証チェック対象外となり、別Webアプリからトークン認証が可能になります。
using System;
using System.Collections.Generic;
using System.Linq;
using System.Web;
using System.Configuration;
using Nancy;
using Nancy.Authentication.Forms;
using Nancy.Authentication.Token;
using Tokenken2Common;

namespace Tokenken2
{
    public class MyBootstrapper : DefaultNancyBootstrapper
    {
        protected override void ApplicationStartup(Nancy.TinyIoc.TinyIoCContainer container, Nancy.Bootstrapper.IPipelines pipelines)
        {
            base.ApplicationStartup(container, pipelines);
            container.Register<ITokenizer>(new Tokenizer((config) =>
            {
                //このメソッドでトークンに追加する要素情報を指定する。デフォルトでUserAgentが設定されているので、それをクリアするようにしてやればOK
                config.AdditionalItems();

                config.WithKeyCache(new DBTokenKeyStore(ConfigurationManager.AppSettings["tokenDbConnection"]));
            }));
        }
    }
}
(2014/06/22追記) トークンの有効期限を延ばす
認証トークンはデフォルト1日、ハッシュ値作成の暗号化キーはデフォルト7日で期限切れとなります。 期限切れになると認証が通らなくなり、期限が切れる度に新しいトークンを発行する必要があります。
認証トークンについて
下記のような文字の羅列です。 dXNlcg0KEHo2MzUzODk2NTg3MDIyWzI1zzA=:pvd44i7dqJrFNpgzo1g/Li5EXt7ZJSpsm/NZ0pjhcMM=
構成としては、:で区切った2要素から構成されています。 先頭要素は、<ユーザー名>,<ユーザークレーム>,<現在日時(UTC時間)>を改行文字でJoinしたものをUtf8のバイト列(A)に変換し、それのBase64変換した文字列で、 末尾要素は、Aのバイト列をHMACSHA256関数で求めたハッシュ値です。
認証処理中での期限切れチェック
認証処理している現在日時と、トークン中の現在日時(UTC時間)の差がトークンの有効期限を超えている場合、認証失敗となります。 私の場合は、ここで引っかかりエラーとなりました。。
対応策
トークンの有効期間を大きくします。TimeSpan(DateTime.MaxValue)とできれば安心でしょうか。 しかし、暗号化キーの有効期限以上に設定することができないので、トークン有効期限<暗号化キー有効期限となるような値をセットすることになります。 指定する際は、暗号化キーの有効期限から設定する必要があるので注意してください。
using System;
using System.Collections.Generic;
using System.Linq;
using System.Web;
using System.Configuration;
using Nancy;
using Nancy.Authentication.Forms;
using Nancy.Authentication.Token;
using Tokenken2Common;

namespace Tokenken2
{
    public class MyBootstrapper : DefaultNancyBootstrapper
    {
        protected override void ApplicationStartup(Nancy.TinyIoc.TinyIoCContainer container, Nancy.Bootstrapper.IPipelines pipelines)
        {
            base.ApplicationStartup(container, pipelines);
            container.Register<ITokenizer>(new Tokenizer((config) =>
            {
                config.AdditionalItems();
                //暗号化キーの有効期限
                config.KeyExpiration(() => new TimeSpan(DateTime.MaxValue.Ticks));
                //認証トークン有効期限
                config.TokenExpiration(() => new TimeSpan(DateTime.MaxValue.AddDays(-1).Ticks));
                //暗号化キー保存処理実行クラスの設定
                config.WithKeyCache(new DBTokenKeyStore(ConfigurationManager.AppSettings["tokenDbConnection"]));
            }));
        }
    }
}
疑問点
なぜトークン生成でのデフォルト構成要素にUserAgentが含まれているのか? 今回のような想定の場合は確実に認証エラーとなるのに含めている理由が不明。→ トークン生成/認証が同一WebAppのパターンしか想定していないため?
セキュリティー的この実装ってどうなの? 今回のは、イントラネット内に構築して、外からの/外へのアクセスは無い環境での案件対応なので、深くはあまり考えていないが、どうなんでしょうか?
*1:詳しく見てないのでどういうものなのかはよくわかってません..
こんなの作る予定
仕事でやることになりそうなので調査してました。
選択文字をフォーマットに沿って展開するマクロ
現時点では繰り返し展開のみ実装しています。
例) ★{10}☆ → ★★★★★★★★★★☆
//SimpleExtend.jsee
var parseTarget = document.selection.Text;
if(parseTarget.match('^(.+)\{(\\d+)\}(.*)$') != null){
	var str = RegExp.$1;
	var cnt = RegExp.$2;
	var footer = RegExp.$3;

	var ret = "";
	for(var i=0;i<cnt;i++){
		ret += str;
	}
	ret += footer;

	document.selection.Text = ret;
}
AngularJS - IEではエレメントのstyle属性に定義したバインド式({{..}})が動作しない??
ChromeとIE11でしか確認していません。
IEでは、スタイル属性のなかでは バインド式が動きませんでした。
ちなみに、data-*属性のなかでは動作し、値が展開されました。
下記コードのisLimitOver()が呼び出しされないのです。。
<li ng-repeat="item in items"
    data-task-id="{{item.id}}"
    data-task-limit="{{item.limit}}"
    data-task-finished="{{item.finished}}">
    <p ng-click="showDetail($index)">
        <input type="checkbox" style="margin-right:30px;" value="{{item.finished}}" />
        <span style="{{ isLimitOver(item.limit) ? 'color:red' : 'color:black' }}">{{item.title}}</span>
    </p>
</li>
AngularJS + jQuery + jQueryUI(ダイアログ) を試してみた
なんとなくTodoアプリを作ってみました。
実際に動くものは ここ で確認できます。
独自ディレクティブについて。
リファクタリングすれば多少はきれいになるとは思いますが、
凝ったことをやろうと思うと結構考えないと、すぐにぐちゃぐちゃになりそうですね。
あと、サービスと同様な感じで分離させれないかなぁ考えています。
今回みたいにcompileでスコープ取得したい場合の公式なやり方が見つけれなくて
独自に実装した(_target変数使ってるところ)んですけど、標準的なやり方ってどんなんでしょう?
地味に詰まったのが、ラジオボタンのON/OFF設定。attr()じゃなくてprop()を使うんですね。。
テンプレート
見た目まんまhtmlです。これがAngularJSによってコンパイルされ、ビューとなります。
独自ディレクティブを作成する必要はありますが、jQueryを使うこともできます。今回はjQueryUIのダイアログを使用しています。
<!DOCTYPE html>
<html>
<head>
	<meta charset="utf-8">
	<title>タスク管理</title>
	<script src="http://ajax.aspnetcdn.com/ajax/jQuery/jquery-2.1.0.min.js"></script>
	<script src="http://ajax.aspnetcdn.com/ajax/jquery.ui/1.10.3/jquery-ui.min.js"></script>
	<link rel="stylesheet" href="http://ajax.aspnetcdn.com/ajax/jquery.ui/1.10.3/themes/smoothness/jquery-ui.css" />
	<script src="https://ajax.googleapis.com/ajax/libs/angularjs/1.2.14/angular.min.js"></script>
	<script src="https://ajax.googleapis.com/ajax/libs/angularjs/1.2.14/angular-route.min.js"></script>
	<script src="http://underscorejs.org/underscore-min.js"></script>
	<script src="services.js"></script>
	<script src="app.js"></script>
	<style>
		li:hover{
			background : #CEF2F5;
			cursor : pointer;
		}
		.todo-item-finished{
			color : green;
		}
		.todo-item-working{
			color : red;
		}
	</style>
</head>
<body ng-app="app">
	<div ng-controller="todoCtrl">
		<form name="form1">
			<p>【新規登録】</p>
			<input type="text" name="newTitle" ng-model="newTitle" ng-init="" required></input>
			<button ng-click="addNewTask()" ng-disabled="form1.$invalid">追加</button>
		</form>
		<div style="margin-top:50px;">
			<p>【タスク一覧】</p>
			<ul style="padding-left:5px;list-style-type:none;">
				<li ng-repeat="item in items" style="hover: background:red;">
					<p todo-editable class="todo-item-{{item.finished ? 'finished' : 'working'}}">{{item.id}} - {{item.title}} / {{item.finished ? '完了' : '未完了'}}</p>
				</li>
			</ul>
		</div>
	</div>
	<div id="dialog-form" title="タスクの編集">
		<p><input type="text" name="title" /></p>
		<p><input type="radio" name="status" id="task-finished" value="true">完了</input>
		<input type="radio" name="status" id="task-working" value="false">未完了</input></p>
	</div>
</body>
</html>
サービス
var services = {};

(function(){
	/**
	* Todoサービス
	*/
	services.TodoService = (function(){
		var Todo = function(){
			this._items = [
				{id : 1, title : "タスク1", finished : false},
				{id : 2, title : "タスク2", finished : true},
				{id : 3, title : "タスク3", finished : false},
				{id : 4, title : "タスク4", finished : true},
				{id : 5, title : "タスク5", finished : false}
			];
		};

		Todo.prototype.getAll = function(){
			return this._items;
		};

		var _add = function(title){
			this._items.push({
				id : this._items.length+1,
				title : title,
				finished : false
			});
		};

		var _update = function(item){
			var updateTgt = _.find(this._items, function(i){ return i.id === item.id;});
			if(updateTgt === undefined){
				_add.call(this, item.title);
			}else{
				updateTgt.title = item.title;
				updateTgt.finished = item.finished;
			}
		};

		Todo.prototype.update = function(item){
			_.isString(item) ? _add.call(this, item) : _update.call(this, item);
		};

		Todo.prototype.delete = function(item){
			//todo:実装
		};

		return Todo;
	})();


	/**
	* 非同期Todoサービス
	*/
	services.AsyncTodoService = (function(){

		//memo:定義場所について。
		//このサービスはAngularJSの$timeoutサービスに依存している。
		//ファクトリの登録関数内で定義するのが正解かもしれない。

		var AsyncTodo = function($timeout){
			this.$timeout = $timeout || function(action){action()};
			this.todo = new services.TodoService();
		};

		AsyncTodo.prototype.getAll = function(){
			return this.todo.getAll();
		};

		var _applyCurrying = function(me, fnc){
			return function(){
				return fnc.apply(me, arguments);
			}
		};

		AsyncTodo.prototype.update = function(item){
			var updAction = _applyCurrying(this.todo, this.todo.update);
			this.$timeout(function(){
				updAction(item);
			}, 1000);
		};

		AsyncTodo.prototype.delete = function(item){
			var delAction = _applyCurrying(this.todo, this.todo.delete);
			this.$timeout(function(){
				delAction(item);
			}, 2000);
		};

		return AsyncTodo;
	})();

})();
コントローラーと独自ディレクティブ
todoCtrlコントローラーとサービス登録、todoEditableディレクティブの定義を行います。
(function(){
	//AngularJSの1.2以降はngRouteのインストール?を明示的に指定する必要がある。
	//http://docs.angularjs.org/error/$injector/modulerr?p0=app&p1=Error:%20%5B$injector:nomod
	var ngtodoApp = angular.module("app",["ngRoute"]);

	ngtodoApp.factory("Todo", ["$timeout", function($timeout){
		return new services.AsyncTodoService($timeout);
	}]);

	ngtodoApp.controller("todoCtrl", ["$scope", "Todo", function($scope, todo){
		$scope.items = todo.getAll();
		$scope.addNewTask = function(){
			todo.update($scope.newTitle);
			alert("登録しました。");
			$scope.newTitle = "";
		};
	}]);

	//以下は http://angularjsninja.com/blog/2013/11/22/angularjs-custom-directives/ より抜粋
	//
	//■compile と link の使い分け
	//compileの function はng-repeatの繰り返しに関係なく一度だけ呼び出されるのに対し、linkの function はイテレーションのたびに呼び出されることになる。
	//compileとlinkの両方を指定した場合にはlinkが無視される仕様になっているため、両方を利用した実装をしたい場合にはcompilefunction からlinkfunction を return するよう実装することになる。
	//
	//
	//■いろいろある link の書き方
	//単にfunctionを return するだけという書き方ができて、これはlinkプロパティだけを持つオブジェクトを返しているのと同じことになる。link以外のプロパティを指定する必要が無ければ、こう書くことでシンプルなコードにできる。
	//
	//  ngtodoApp.directive("listRow", function(){
	//  	return function(scope, element, attrs){
	//  		...
	//  	};
	//  });
	//
	ngtodoApp.directive("todoEditable", ["Todo", function(todo){

		var _target = (function(){

			function Target(){
				this.scope = {};
			}

			Target.prototype.clear = function(){
				this.scope = undefined;
				this.scope = { $index : -1 };  //ダミースコープオブジェクトのセット
			};

			var tgtObj = new Target();
			tgtObj.clear();
			return tgtObj;
		})();

		return {
			restrict: 'A',
			compile : function(element, attrs){
				var okClick = function(){
					var dialog = $("#dialog-form");
					var title = $("input[name='title']",dialog).val();
					var finished = $("input[type='radio']:eq(0)",dialog).prop("checked");

					if(_.isEmpty(title)){
						alert("タイトルが未入力です");
						return;
					}

					todo.update({
						id : _target.scope.item.id,
						title : title,
						finished : finished
					});

					$(this).dialog("close");
					_target.clear();
				};

				var cancelClick = function(){
					$(this).dialog("close");
					_target.clear();
				};

				$("#dialog-form").dialog({
					autoOpen: false,
					height: 280,
					width: 350,
					modal: true,
					buttons: [
						{
							text: "OK",
							click : okClick
						},
						{
							text: "Cancel",
							click : cancelClick
						}
					]
				});

				return function(scope, element, attrs){
					$(element).click(function(){
						_target.scope = scope;
						var dialog = $("#dialog-form");
						$("input[name='title']", dialog).val(scope.item.title);

						if(scope.item.finished)
							$("#task-finished", dialog).prop("checked", true);
						else
							$("#task-working", dialog).prop("checked", true);

						dialog.dialog("open");
					});
				};
			}
		};
	}]);
})();
ASP.NET WebForms で非同期処理を行う (.net4.5)
WebPageではasync/awaitをそのまま使うことができません。
利用するには以下の手順を踏みます。
1,Web.config設定
/configuration/appSettingsに、key=UseTaskFriendlySynchronizationContextな項目を追加。
詳細は下記を参照。
<configuration>
  ....
  <appSettings>
    <add key="aspnet:UseTaskFriendlySynchronizationContext" value="true" />
    ....
  </appSettings>
  ....
</configuration>
2,aspxファイルのページディレクティブ設定
末尾の「Async="true"」を追加する。コード例は下記を参照。
<%@ Page Language="C#" AutoEventWireup="true" CodeBehind="WebForm.aspx.cs" Inherits="Sample.WebForm" Async="true" %>
3,RegisterAsyncTaskメソッドに非同期タスク登録
Page.RegisterAsyncTask()に非同期なタスクを登録する。コード例は下記を参照。
登録タスクを実行するには、Page.ExecuteRegisteredAsyncTasks()を明示的に呼び出す必要あり。
未実行タスクはPreRenderイベントとPreRenderCompleteイベントの間で実行される。
protected override void OnLoad(EventArgs e)
{
    ....
    RegisterAsyncTask(new PageAsyncTask(async () =>
    {
        var httpClient = new System.Net.Http.HttpClient();
        var res = await httpClient.GetAsync("http://localhost/Hogege");
        ....
    }));
    ....
}